
- 1. Ingredients Needed for Chocolate Hazelnut Tartlets
- 2. Preparing the Tartlet Dough
- 3. Making the Chocolate Hazelnut Filling
- 4. Assembling and Baking the Tartlets
- 5. Serving and Enjoying Your Tartlets
1. Ingredients Needed for Chocolate Hazelnut Tartlets
To make these rich and indulgent chocolate hazelnut tartlets, you will need a few key ingredients that bring out the best flavors. Here’s what you’ll need:
- For the Tartlet Dough: All-purpose flour, butter, powdered sugar, egg yolk, and a pinch of salt.
- For the Chocolate Hazelnut Filling: Dark chocolate, hazelnut spread (such as Nutella), heavy cream, butter, and vanilla extract.
- For Garnish (optional): Chopped hazelnuts, whipped cream, or extra chocolate shavings.
These ingredients are easy to find and will make for an incredibly delicious tartlet that is sure to impress your guests or satisfy your sweet tooth.

Huascar & Co. Bakeshop / huascar & co. bakeshop
New YorkNew York CountyNew York
453 W 54th St, New York, NY 10019, USA
2. Preparing the Tartlet Dough
Start by making the tartlet dough, which will form the base of your dessert. Here's how to do it:
- Mix the dry ingredients: In a large bowl, combine the all-purpose flour, powdered sugar, and a pinch of salt. Mix them together until well combined.
- Add the butter: Cut the cold butter into small pieces and add it to the dry ingredients. Use your fingers or a pastry cutter to rub the butter into the flour mixture until it resembles coarse crumbs.
- Add the egg yolk: Add the egg yolk to the mixture and mix until the dough starts to come together. If the dough feels too dry, add a teaspoon of cold water at a time until it forms a ball.
- Chill the dough: Wrap the dough in plastic wrap and refrigerate it for at least 30 minutes to firm up.
Once your dough is chilled, it will be ready to roll out and press into tartlet pans.

Auntie Anne's / auntie anne's albany ga
1 Crossgates Mall Rd Sp K103, Albany, NY 12203, USA
3. Making the Chocolate Hazelnut Filling
While your dough is chilling, it's time to prepare the chocolate hazelnut filling. This filling is rich, creamy, and full of flavor!
- Heat the cream: In a small saucepan, heat the heavy cream over medium heat until it just begins to simmer. Be careful not to let it boil.
- Combine with chocolate: Place the dark chocolate pieces in a heatproof bowl. Once the cream is hot, pour it over the chocolate and let it sit for a few minutes. Stir the mixture until the chocolate is completely melted and smooth.
- Add the hazelnut spread: Stir in the hazelnut spread, butter, and vanilla extract. Mix until everything is well combined, and the filling is smooth and glossy.
Your chocolate hazelnut filling is now ready to be poured into your tartlet shells.
4. Assembling and Baking the Tartlets
Now that you have your tartlet dough and filling ready, it’s time to assemble and bake your tartlets!
- Preheat the oven: Preheat your oven to 350°F (175°C) to ensure it’s at the right temperature when you’re ready to bake.
- Roll out the dough: Roll out the chilled dough on a lightly floured surface to about 1/8 inch thickness. Use a round cutter to cut out circles that fit your tartlet pans.
- Press into tartlet pans: Press the dough circles into the tartlet pans, making sure to gently press the dough into the edges. Use a fork to poke small holes in the bottom of each crust to prevent it from puffing up during baking.
- Fill with the chocolate mixture: Spoon the chocolate hazelnut filling into each tartlet shell, filling them about three-quarters full.
- Bake: Bake the tartlets for 15-20 minutes, or until the crust is golden brown. The filling should be set but still slightly soft in the center.
Allow the tartlets to cool before removing them from the pans.
5. Serving and Enjoying Your Tartlets
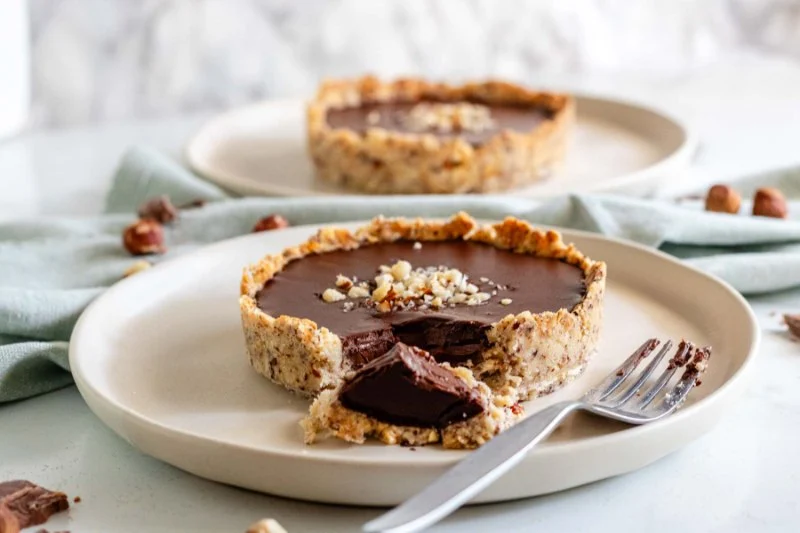
Once the tartlets have cooled, it’s time to enjoy your delicious homemade chocolate hazelnut tartlets! You can serve them as they are, or add a few garnishes to make them even more decadent.
- Top with whipped cream: A dollop of freshly whipped cream complements the rich filling perfectly.
- Sprinkle with chopped hazelnuts: For added texture and flavor, sprinkle chopped hazelnuts on top.
- Drizzle with melted chocolate: For an extra touch of indulgence, drizzle melted chocolate over the top of the tartlets.
These tartlets are perfect for any occasion, from a casual family dessert to a special celebration. Enjoy with a cup of coffee or a glass of dessert wine for the ultimate treat!
If you're looking for more baking supplies or tips, visit Heavenly Delights Bakery for everything you need to make your baking experience even sweeter!


 Safeway Bakery4.0 (6 reviews)
 VT Bake House4.0 (9 reviews)
 Pandebono Bakery4.0 (625 reviews)
 Las Delicias Panaderia Y Antojitos4.0 (174 reviews)
 King of all guacamoles Cafe & Bakery3.0 (5 reviews)
 Better Grains Bakery, LLC5.0 (70 reviews)
 Vegan Pastry Recipes That Will Wow Your Guests: Delicious and Easy Ideas
 How to Make Bakery-Style Butter Cookies with a Crisp, Light Texture
 How to Make a Classic Strawberry Shortcake from Scratch
 The Ultimate Guide to Making Bakery-Style Cupcakes at Home
 How to Make the Best Almond Joy Cupcakes: Easy Recipe and Tips
 How to Create the Perfect Bakery-Style Fruit Galette