
- What Makes Artisan Bread Unique?
- Key Ingredients for Homemade Artisan Bread
- Step-by-Step Guide to Making Artisan Bread
- Tips for Perfecting Your Artisan Bread
- Real-Life Success Story: Baking Artisan Bread at Home
What Makes Artisan Bread Unique?
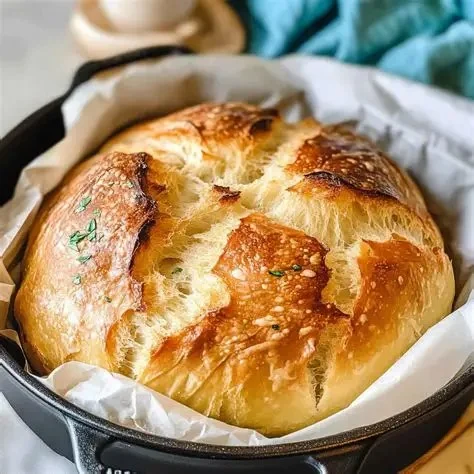
Artisan bread is often characterized by its use of high-quality ingredients, simple techniques, and a slower fermentation process. Unlike mass-produced breads, artisan bread is typically handcrafted, giving it a distinct texture, flavor, and appearance. It’s made with a focus on the craftsmanship of baking rather than speed and automation.
What makes artisan bread so special is its balance of flavor, texture, and appearance. It’s often baked in smaller batches, using traditional methods that allow the dough to develop complex flavors and a chewy, satisfying texture. The crust is usually thicker and more robust, and the crumb (the inside of the bread) is light and airy, with irregular holes that add to the rustic charm.

Bagelsaurus / baglesaurus
CambridgeMiddlesex CountyMassachusetts
1796 Massachusetts Ave, Cambridge, MA 02140, USA
Key Ingredients for Homemade Artisan Bread
Before you begin making your own artisan bread, it's important to understand the key ingredients that make this bread so unique. Each element plays a role in creating the perfect loaf:

Bova's Bakery / bova's bakery boston
BostonSuffolk CountyMassachusetts
134 Salem St, Boston, MA 02113, USA
1. Flour
Flour is the foundation of any bread recipe. For artisan bread, it's recommended to use high-quality bread flour or a mix of whole wheat and all-purpose flour. The higher protein content in bread flour helps the dough rise and achieve that chewy texture. You can also experiment with specialty flours, like rye, for a unique flavor.
2. Water
Water is crucial for activating the yeast and creating the right texture in the dough. The temperature of the water should be lukewarm—about 110°F (43°C)—which helps activate the yeast without killing it.
3. Yeast
Yeast is what makes the bread rise. For artisan bread, you can use either active dry yeast or a sourdough starter for a more tangy, complex flavor. Sourdough starters are made by fermenting flour and water with wild yeast, and they can take longer to develop but yield a unique taste.
4. Salt
Salt enhances the flavor of the bread and strengthens the dough’s structure. It also helps control the fermentation process by regulating the yeast activity, ensuring the dough doesn’t overproof.
Step-by-Step Guide to Making Artisan Bread
Now that you know the key ingredients, let’s dive into the process of making your own artisan bread at home. Follow this simple guide for your first homemade loaf:
1. Mix the Dough
Start by combining the flour, water, yeast, and salt in a large bowl. Mix until the dough comes together. Don’t worry if it seems a bit sticky—that’s normal for artisan bread dough.
2. Knead the Dough
Turn the dough out onto a lightly floured surface and knead it for about 10 minutes, or until it’s smooth and elastic. If you're using a stand mixer, you can knead it with the dough hook attachment on low speed for about 5 minutes.
3. Let the Dough Rise
Place the dough in a lightly oiled bowl and cover it with a damp cloth. Let it rise in a warm place for about 1-2 hours, or until it has doubled in size. This step is crucial for developing the flavor and texture of the bread.
4. Shape the Dough
After the dough has risen, punch it down gently to release the air bubbles. Turn it out onto a floured surface and shape it into a round or oval loaf. You can also shape it into smaller loaves if you prefer. Be gentle during this step to retain the air bubbles for a lighter crumb.
5. Final Rise
Allow the shaped dough to rise again for about 30 minutes to 1 hour, until it puffs up. This is known as the second rise, and it will give your bread the perfect texture and rise.
6. Bake the Bread
Preheat your oven to 450°F (230°C). If you have a pizza stone, place it in the oven while it heats up to get a crispy crust. Transfer your dough onto a parchment paper-lined baking sheet or directly onto the pizza stone. Bake for 25-30 minutes, or until the bread has a golden-brown crust and sounds hollow when tapped on the bottom. Allow it to cool completely before slicing.
Tips for Perfecting Your Artisan Bread
While making artisan bread is relatively simple, there are a few tips that can help elevate your baking game:
1. Use a Dutch Oven for a Crispy Crust
If you want an extra-crispy crust, consider baking your artisan bread in a Dutch oven. The heavy lid traps steam inside, creating a bakery-quality crust.
2. Experiment with Sourdough Starter
If you're feeling adventurous, try making your own sourdough starter for a tangy, rich flavor. This requires a little more patience and care, but the end result is worth it for the complex flavor it brings to your bread.
3. Don’t Rush the Fermentation Process
Artisan bread benefits from a longer fermentation process, which allows the flavors to develop more fully. If you have the time, try refrigerating your dough overnight for a slower rise and more depth of flavor.
4. Keep a Consistent Oven Temperature
Make sure your oven is properly preheated and maintains a consistent temperature throughout the baking process. A fluctuating temperature can lead to uneven baking and affect the final texture of your bread.
Real-Life Success Story: Baking Artisan Bread at Home
Meet Jane, a home baker from California who was determined to make the perfect loaf of artisan bread. At first, her loaves turned out too dense and lacked flavor, but she didn't give up. After experimenting with different types of flour and adjusting her fermentation times, she finally perfected her recipe. The next time she made bread, her family and friends were amazed by the light, flavorful loaves with a perfect crust. Her homemade bread became a hit at local gatherings, and soon, she was even selling her loaves at the farmers' market.
Jane’s story is a testament to the power of persistence and learning the art of bread making. It’s a skill that anyone can master with time, patience, and a little trial and error. If you're looking to start your own baking journey, it’s worth the effort for the reward of fresh, homemade artisan bread.
For more baking tips and artisan bread recipes, visit Heavenly Delights Bakery for the best tools, ingredients, and baking services.


 Jeff's Bagel Run4.0 (67 reviews)
 The Breadery4.0 (473 reviews)
 Philly Pretzel Factory4.0 (89 reviews)
 Connor's Goody Bag4.0 (20 reviews)
 Auntie Anne's3.0 (24 reviews)
 Sweet Cakes, in home bakery, made to order items4.0 (14 reviews)
 How to Make the Best Fresh Lemon Curd for Tarts – Heavenly Delights Bakery
 How to Make Delicious Apple Cinnamon Donuts
 The Most Underrated Bakery Treats You Should Definitely Try
 How to Make Homemade Caramel Sauce for Desserts | Heavenly Delights Bakery
 The Best Bakery Items to Enjoy During the Winter Holidays
 The Best Way to Bake with Fresh Herbs and Spices