
7 Essential Steps to Baking the Perfect Bakery-Style Loaf
- Understanding the Basics of Baking a Loaf
- Choosing the Right Ingredients for Your Bread
- Kneading the Dough: The Key to Perfect Texture
- Letting the Dough Rise: Why Patience is Crucial
- Shaping Your Loaf for a Bakery-Style Appearance
- Baking Tips: Getting the Perfect Crust and Softness
- Real-Life Story: A Home Baker’s Journey to Perfection
Understanding the Basics of Baking a Loaf
Baking a perfect loaf of bread might seem daunting, but it doesn’t have to be. With a little understanding of the process, you can bake a bakery-style loaf in your own kitchen. The key is to follow the right steps, from selecting the best ingredients to using the right techniques. Let’s walk through the essential steps for achieving that perfect, fluffy loaf every time.

CookiesNCream / cookies n cream bronxville
BronxvilleWestchester CountyNew York
10 Park Pl, Bronxville, NY 10708, USA
Choosing the Right Ingredients for Your Bread
The foundation of a perfect loaf begins with the right ingredients. While bread recipes may vary, there are a few key components you’ll need to get started:

Atla's Conchas / atlas conchas
New YorkNew York CountyNew York
347 E 109th St, New York, NY 10029, USA
1. Flour: The Base of Your Loaf
For a bakery-style loaf, high-quality all-purpose flour or bread flour is essential. Bread flour has a higher protein content, which helps with gluten development, giving your loaf its perfect structure.
2. Yeast: The Magic Ingredient
Yeast is responsible for the rise of your dough. Active dry yeast or instant yeast are commonly used for home baking. Make sure to check the expiration date for the best results.
3. Salt: Enhancing Flavor
Salt not only enhances the flavor of the bread, but it also helps control the fermentation process by slowing down yeast activity. Don’t skip this essential ingredient.
4. Water: Hydration is Key
The right amount of warm water is critical for activating the yeast and hydrating the flour. Make sure the water temperature is warm but not too hot to avoid killing the yeast.
Kneading the Dough: The Key to Perfect Texture
Kneading is the process of working the dough to develop gluten, which gives the bread its chewy and airy texture. Knead the dough for about 8-10 minutes, or until it becomes smooth and elastic. If you’re using a stand mixer, it can help speed up this process. The dough should be soft but not sticky.
Letting the Dough Rise: Why Patience is Crucial
After kneading, it’s time for the dough to rise. This step is essential for achieving the light, fluffy texture of bakery-style bread. Place the dough in a warm, draft-free area and cover it with a damp cloth. Allow it to rise for about 1-2 hours or until it has doubled in size. Don’t rush this process; a proper rise is crucial for the development of flavor and texture.
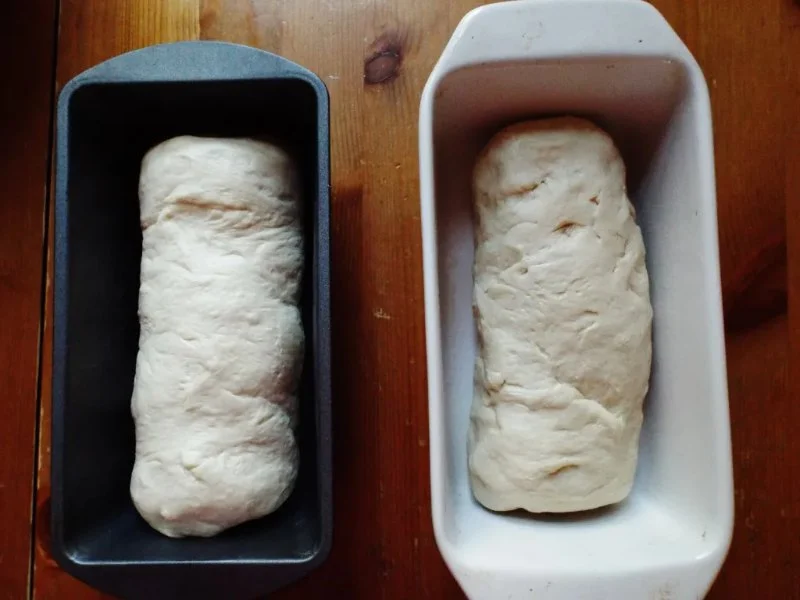
Shaping Your Loaf for a Bakery-Style Appearance
Once your dough has risen, it’s time to shape it. Punch down the dough to release any air bubbles, then shape it into your desired loaf form. Whether you’re shaping it into a round boule or an oblong loaf, be sure to handle the dough gently to retain its air pockets.
1. Shaping the Dough
To create a smooth, uniform loaf, roll the dough into a tight log and pinch the seams closed. This helps create a consistent shape and ensures an even bake.
2. Second Rise
Let the shaped dough rise again for about 30 minutes to an hour. This second rise helps the loaf develop more volume and softness. If you’re aiming for a rustic, bakery-style loaf, this step is especially important.
Baking Tips: Getting the Perfect Crust and Softness
The final step is baking your loaf to perfection. The right temperature and baking method can make all the difference when it comes to achieving that golden-brown, crispy crust and soft, airy interior.
1. Preheat Your Oven
Always preheat your oven to 375°F (190°C) or the temperature recommended in your recipe. A well-heated oven ensures even baking and helps the loaf rise properly during the initial phase of baking.
2. Steam for a Crisp Crust
To achieve that signature bakery-style crispy crust, introduce steam into the oven during the first few minutes of baking. You can do this by placing a pan of water in the oven or spraying the loaf with water before baking. This steam will help the bread expand and form a golden-brown, crisp exterior.
3. Check for Doneness
To check if your bread is fully baked, tap the bottom of the loaf. If it sounds hollow, it’s ready. Alternatively, use a thermometer; the internal temperature should be around 190-200°F (88-93°C).
Real-Life Example: A Home Baker’s Journey to Perfection
Let’s consider Sarah, an avid home baker who wanted to create the perfect bakery-style loaf. After struggling with dense loaves for months, she learned that her dough wasn’t rising enough during the first rise. By adjusting her kneading process and allowing her dough to rise in a warm, controlled environment, Sarah achieved her goal of baking light, airy loaves with golden-brown crusts. Her experience highlights how patience and understanding each step in the baking process is key to success in bread-making.


 Tainos Bakery & Deli (Casselberry)4.0 (1525 reviews)
 Mamas Bagels4.0 (9 reviews)
 Meg's Macs and More5.0 (4 reviews)
 Billy's Bakery4.0 (679 reviews)
 Impallaria Bakery & Deli4.0 (251 reviews)
 Jerusalem Sweets4.0 (56 reviews)
 How to Bake the Best Homemade Focaccia Bread with Herbs: Step-by-Step Guide
 How to Start Your Own Home Bakery Business: A Step-by-Step Guide
 The Best Way to Bake with Fresh Herbs and Spices: Enhance Your Recipes
 How to Make the Best Butter Tarts from Scratch
 Top 10 Most Popular Cookies and How to Make Them
 How to Make the Best Coconut Macaroons from Scratch