
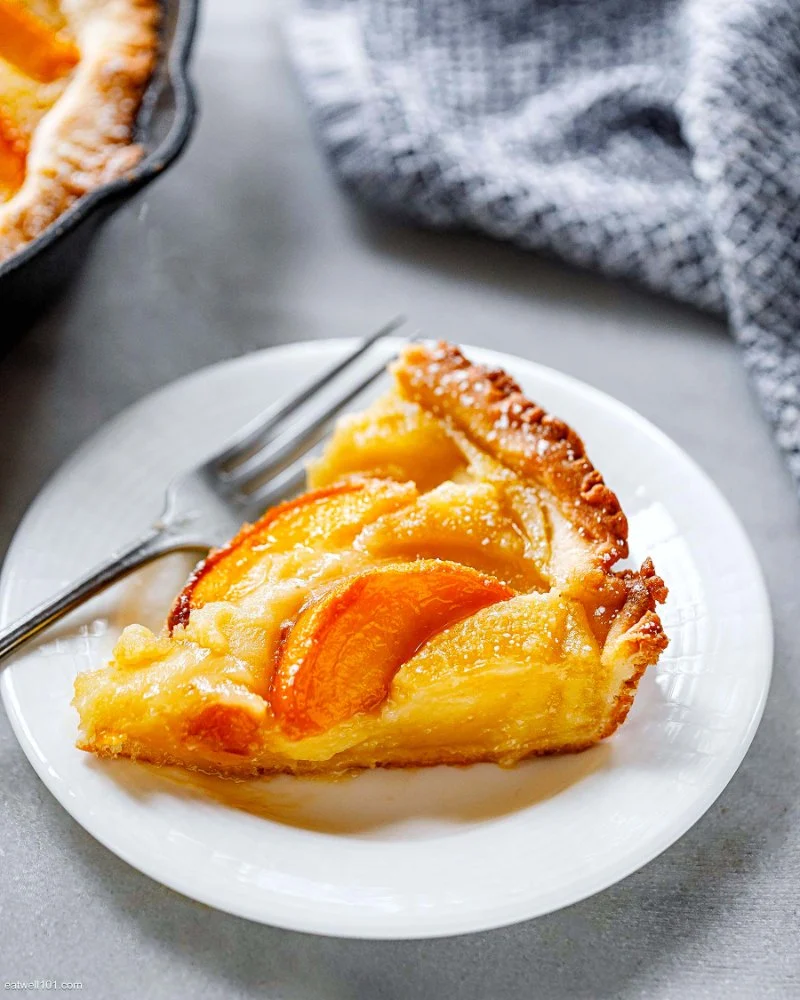
How to Make a Perfect Bakery-Style Peach Tart with a Flaky Crust
- Ingredients for a Bakery-Style Peach Tart
- How to Make the Flaky Crust
- Creating the Perfect Peach Filling
- How to Bake and Assemble Your Peach Tart
- Tips for Serving and Storing Your Peach Tart
Ingredients for a Bakery-Style Peach Tart
Making a perfect peach tart requires the right ingredients for both the crust and the filling. Here's what you'll need to create this delicious summer dessert:
- 1 ½ cups all-purpose flour
- ½ cup cold unsalted butter
- ¼ cup granulated sugar
- 1 egg yolk
- 3-4 ripe peaches, peeled and sliced
- ¼ cup light brown sugar
- 2 tbsp cornstarch
- 1 tbsp lemon juice
- 1 tsp vanilla extract
- 1 tbsp butter, cut into small pieces
The quality of your peaches is crucial for this recipe. Choose ripe, fragrant peaches to ensure a rich flavor in your tart. The crust should be flaky and tender, while the filling needs to be sweet, juicy, and perfectly set with just the right amount of texture.

Anthony & Sons Bakery / anthony & sons denville nj
DenvilleMorris CountyNew Jersey
20 Luger Rd, Denville, NJ 07834, USA
How to Make the Flaky Crust
The secret to a bakery-style peach tart lies in a buttery, flaky crust that melts in your mouth. Here's how to achieve that perfect crust:

Lancaster Cupcake / lancaster cupcakes lebanon
LebanonLebanon CountyPennsylvania
111 Springwood Dr Suite 200, Lebanon, PA 17042, USA
1. Mix the Dough
Start by combining the flour and sugar in a large bowl. Then, add the cold butter, cutting it into the flour with a pastry cutter or your fingers until the mixture resembles coarse crumbs. Add the egg yolk and mix just until the dough begins to come together. Be careful not to overwork the dough, as this can make the crust tough.
2. Chill the Dough
Form the dough into a ball, wrap it in plastic wrap, and chill it in the refrigerator for at least 30 minutes. Chilling the dough helps to relax the gluten and keeps the butter cold, resulting in a flakier texture when baked.
3. Roll Out the Dough
Once chilled, roll the dough out on a lightly floured surface. Aim for a thickness of about ¼ inch. Gently transfer the dough into a tart pan, pressing it into the edges. Trim off any excess dough and refrigerate the crust again while you prepare the filling.
Creating the Perfect Peach Filling
Now it’s time to prepare the delicious peach filling. The key is to balance the natural sweetness of the peaches with a touch of tartness, creating a filling that is juicy yet firm enough to hold its shape when sliced.
1. Prepare the Peaches
Peel and slice the peaches into thin wedges. You can use a paring knife or a vegetable peeler to remove the skin. The thinner the slices, the more evenly they will bake. If the peaches are particularly juicy, gently blot them with a paper towel to remove excess moisture.
2. Mix with Sugar and Cornstarch
In a medium bowl, toss the peach slices with brown sugar, cornstarch, lemon juice, and vanilla extract. The cornstarch helps to thicken the juices as they bake, creating a smooth, glossy filling. The lemon juice adds a refreshing tartness that complements the natural sweetness of the peaches.
3. Assemble the Filling
Once the peaches are well-coated, pour them into the prepared crust. Dot the filling with small pieces of butter to help enhance the flavor and ensure a golden, crisp finish as it bakes.
How to Bake and Assemble Your Peach Tart
With the crust and filling prepared, it's time to bake and assemble your tart. The baking process is what brings everything together, giving you a golden, bubbly peach tart with a perfectly crisp crust.
1. Preheat the Oven
Preheat your oven to 375°F (190°C). Place the tart pan on a baking sheet to catch any drips from the filling as it bakes.
2. Bake the Tart
Bake the tart for about 45-50 minutes, or until the crust is golden brown and the peach filling is bubbling. Keep an eye on the edges of the crust; if they start to brown too quickly, cover them with aluminum foil to prevent burning.
3. Cool the Tart
Once baked, remove the tart from the oven and allow it to cool for at least 30 minutes. This helps the filling set and makes it easier to slice. For an added touch, dust the top with powdered sugar before serving.
Tips for Serving and Storing Your Peach Tart
Now that your peach tart is ready, here are some tips for serving and storing this delicious dessert:
1. Serving Suggestions
Serve the peach tart as-is, or with a dollop of whipped cream or a scoop of vanilla ice cream for an extra indulgent treat. The tart is best served at room temperature, allowing the flavors to fully develop. For a festive touch, drizzle a little honey over the top before serving.
2. Storing the Tart
If you have leftovers, store the tart in the refrigerator for up to 3 days. You can also freeze individual slices for up to 3 months. To reheat, simply place the slices in the oven at 350°F (175°C) for 10-15 minutes until warmed through and the crust crisps up again.
3. Variations
Feel free to experiment with different fruits in place of peaches. Nectarines, plums, or mixed berries make excellent substitutes. You can also add a sprinkle of cinnamon or nutmeg to the filling for a warm, spicy flavor that complements the peaches.
Where to Find the Best Ingredients and Tools for Your Peach Tart
To make your peach tart even more special, consider using high-quality ingredients like organic peaches and premium butter. If you're looking for the best tools to create a perfect tart, visit Ac Fix for top-notch baking tools, such as tart pans, pastry cutters, and rolling pins. The right tools can elevate your baking experience and help you achieve bakery-quality results every time.


 Mamie Colette4.0 (184 reviews)
 panaderia la Dulzura Bakery la #34.0 (2 reviews)
 Casa Flora Bakeshop4.0 (8 reviews)
 Valerio’s Bakehouse3.0 (41 reviews)
 Ricky Bakery #4 (London Square)3.0 (353 reviews)
 Poore Man Bakery5.0 (5 reviews)
 The Best Baking Secrets for Making Fluffy Muffins Every Time
 How to Make Homemade Peanut Butter Cookies: A Simple and Delicious Recipe
 How to Make the Best Homemade Chocolate Covered Oreos Step-by-Step
 How to Make the Best Homemade Granola Bars for Healthy Snacking
 How to Make Delicious Scones with Fresh Cream and Jam: A Simple Guide
 How to Bake Perfect Homemade Garlic Knots