
- 1. Introduction to Pita Bread
- 2. Essential Ingredients for Perfect Pita Bread
- 3. Step-by-Step Guide to Making Pita Bread
- 4. Tips for Perfecting Your Pita Bread
- 5. Flavor Variations and Creative Twists
- 6. Real-Life Case Study: Homemade Pita Bread Success
1. Introduction to Pita Bread
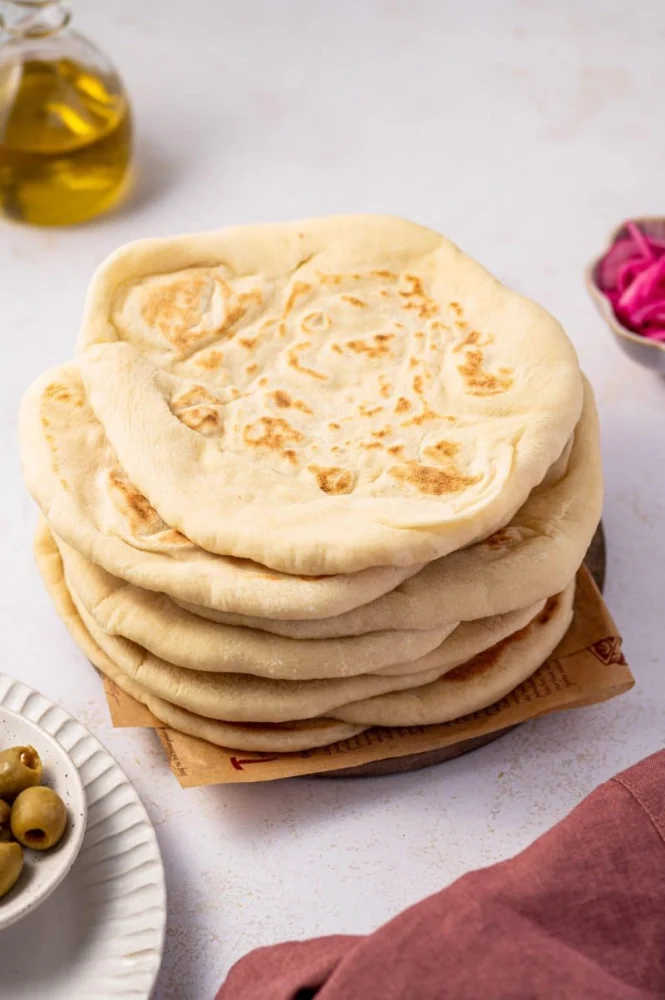
Pita bread, with its soft, fluffy texture and deliciously airy pockets, is a staple of Middle Eastern and Mediterranean cuisines. Making it at home is easier than you might think, and the best part is that you can have fresh pita bread ready in just 30 minutes. Whether you’re pairing it with hummus, falafel, or using it as a wrap for your favorite fillings, homemade pita bread elevates any meal. In this guide, we’ll walk you through the simple steps to make your own pita bread from scratch in no time!

Huascar & Co. Bakeshop / huascar bakery
New YorkNew York CountyNew York
453 W 54th St, New York, NY 10019, USA
2. Essential Ingredients for Perfect Pita Bread
The ingredients for making homemade pita bread are simple but essential for getting the perfect texture and flavor. Here’s what you’ll need:
- All-Purpose Flour: The main ingredient for the dough. You can use whole wheat flour for a healthier version.
- Instant Yeast: Instant yeast ensures a quicker rise and fluffier bread, making this recipe fast and easy.
- Water: Warm water is crucial for activating the yeast and helping the dough rise.
- Olive Oil: Adds richness and flavor to the dough, giving the pita a soft texture.
- Salt: Enhances the flavor of the bread and balances the sweetness of the flour.
- Sugar: A small amount of sugar helps activate the yeast and gives the dough a little sweetness.
3. Step-by-Step Guide to Making Pita Bread
Making pita bread is quick and easy. Just follow these steps, and you’ll have fresh, fluffy pita bread in 30 minutes:
- Prepare the Dough: In a large mixing bowl, combine 2 cups of all-purpose flour, 1 teaspoon of instant yeast, 1 teaspoon of sugar, and 1 teaspoon of salt. Add 3/4 cup of warm water and 1 tablespoon of olive oil. Stir until a dough forms.
- Knead the Dough: Transfer the dough to a floured surface and knead for about 5-7 minutes, or until the dough is smooth and elastic.
- Let It Rise: Place the dough in a lightly oiled bowl, cover it with a damp towel, and let it rise for about 10-15 minutes until it doubles in size.
- Divide and Shape: After the dough has risen, punch it down and divide it into 6 equal portions. Roll each portion into a ball and then flatten each ball into a circle about 1/4 inch thick.
- Cook the Pita: Heat a cast-iron skillet or heavy-bottomed pan over medium-high heat. Place one pita at a time into the hot pan and cook for 2-3 minutes per side until it puffs up and forms golden brown spots. Flip and cook the other side until lightly browned.
- Cool and Serve: Remove the pita from the pan and place it on a clean kitchen towel to keep it soft. Serve warm, or let it cool for later use.
4. Tips for Perfecting Your Pita Bread
To ensure your pita bread turns out perfectly every time, keep these tips in mind:
- Don’t Overwork the Dough: When kneading, avoid overworking the dough as it can lead to tough pita. Just knead until smooth.
- Use High Heat: Make sure your pan is hot enough before placing the dough in it. This helps the pita puff up and form the signature pocket.
- Roll Evenly: Roll the dough evenly to ensure uniform cooking. If one side is thicker than the other, the pita may not puff properly.
- Keep the Pita Covered: After cooking, cover the pita with a towel to keep it soft and warm.
5. Flavor Variations and Creative Twists
While traditional pita bread is delicious on its own, you can experiment with different flavors and fillings. Here are some ideas:
- Herbed Pita: Add finely chopped herbs such as rosemary, thyme, or oregano to the dough for an aromatic twist.
- Garlic Pita: Brush the cooked pita with garlic butter for a savory, fragrant finish.
- Spicy Pita: Add a pinch of cayenne pepper or paprika to the dough to give your pita a spicy kick.
- Sweet Pita: For a sweeter version, drizzle honey over the warm pita and sprinkle with cinnamon and sugar.
6. Real-Life Case Study: Homemade Pita Bread Success
A friend of mine, an avid home cook, decided to give pita bread a try after discovering how easy it could be to make at home. She was initially nervous about the process but was pleasantly surprised by how quickly and effortlessly the dough came together. After just 30 minutes, she had a batch of warm, puffy pitas, perfect for serving with her favorite Mediterranean dips. Not only did they taste amazing, but her family was impressed with the homemade touch. She now makes pita bread regularly for her family dinners and says it’s one of her most rewarding cooking experiences.


 Madenat Al-Taybat4.0 (28 reviews)
 Brads Cookie Nook5.0 (7 reviews)
 Bakeri Queens4.0 (89 reviews)
 GRANNY'S DONUTS INC4.0 (164 reviews)
 The Bagel Basket4.0 (218 reviews)
 Cupcakes and Cookies Too DBA: My Mom's Cookies3.0 (2 reviews)
 How to Make the Best Flaky Croissant Dough from Scratch: A Step-by-Step Guide
 How to Bake the Best Homemade Chocolate Eclairs: Step-by-Step Guide
 How to Make the Best Soft Pretzels with Sea Salt | Heavenly Delights Bakery
 How to Bake Perfect Lemon Bars with a Shortbread Crust
 How to Make the Best Chocolate Raspberry Tart: Step-by-Step Guide
 How to Bake the Best Crusty Artisan Bread in a Dutch Oven | Step-by-Step Guide