
- 1-Step 1: Gather Your Ingredients
- 2-Step 2: Melt the Chocolate
- 3-Step 3: Dipping the Oreos
- 4-Step 4: Decorating the Oreos
- 5-Step 5: Letting the Chocolate Set
- 6-Tips for Perfect Chocolate-Covered Oreos
1-Step 1: Gather Your Ingredients
To make the best homemade chocolate-covered Oreos, start by gathering your ingredients and tools. Here's what you’ll need:
- Oreos: Classic Oreos are the best for this recipe, but you can experiment with different flavors if you prefer.
- Chocolate: You can use milk chocolate, dark chocolate, or white chocolate, depending on your preference. High-quality chocolate chips or bars work best.
- Sprinkles or Toppings: Optional, but fun! You can add colorful sprinkles, crushed nuts, or even a drizzle of caramel to make your Oreos extra special.
- Tools: A microwave-safe bowl, a spoon or fork for dipping, parchment paper for setting, and a cooling rack are all you need.
2-Step 2: Melt the Chocolate
The key to smooth, perfectly coated chocolate-covered Oreos is properly melting the chocolate. Here’s how:
- Using the Microwave: Place your chopped chocolate or chocolate chips into a microwave-safe bowl. Microwave the chocolate in 20-30 second intervals, stirring in between to ensure it melts evenly.
- Using a Double Boiler: If you prefer, you can melt your chocolate on the stovetop by using a double boiler. Fill a saucepan with a bit of water and place the bowl with chocolate over it, making sure the bowl doesn’t touch the water. Stir the chocolate until smooth.
- Tip: Don’t overheat the chocolate, as it can seize up and become lumpy. If it’s too thick, add a small amount of vegetable oil to thin it out.
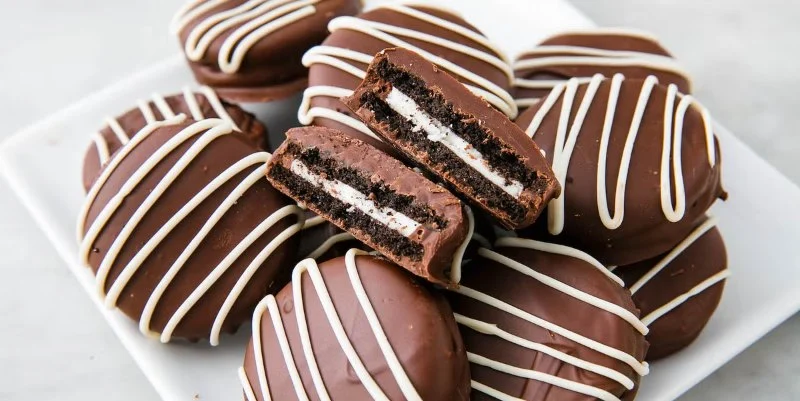
3-Step 3: Dipping the Oreos
Now comes the fun part: dipping the Oreos into the melted chocolate. Here’s how to do it right:
- Coat the Oreos: Use a spoon or fork to dip each Oreo into the melted chocolate. Make sure it’s fully coated, and gently tap the utensil to let any excess chocolate drip off.
- Covering Evenly: You want an even layer of chocolate. If necessary, use a spoon to spread the chocolate over any spots that may have been missed during the dip.
- Tip: Be gentle to avoid breaking the Oreos during the dipping process. If you’re worried about this, try dipping the Oreos one by one with a fork for added control.
4-Step 4: Decorating the Oreos
Make your chocolate-covered Oreos even more delicious and eye-catching by adding some fun decorations:
- Sprinkles: While the chocolate is still wet, sprinkle your favorite colorful sprinkles or edible glitter over the top.
- Crushed Nuts or Cookies: Crushed almonds, peanuts, or even extra crushed Oreos add texture and flavor.
- Drizzles: Once the Oreos are coated, drizzle a contrasting chocolate (such as white chocolate over milk chocolate) to create a beautiful design.
5-Step 5: Letting the Chocolate Set
After the Oreos are dipped and decorated, it’s time to let the chocolate set. Here's what to do:
- Place on Parchment Paper: Lay the chocolate-covered Oreos on a sheet of parchment paper. This prevents the cookies from sticking as the chocolate hardens.
- Cool the Oreos: Allow the Oreos to set at room temperature for about 30 minutes to 1 hour, or until the chocolate is completely hardened. Alternatively, place them in the fridge for a quicker set.
- Tip: If you're in a rush, the fridge can speed up the setting process, but be mindful not to leave them in too long as the chocolate can get too hard.
6-Tips for Perfect Chocolate-Covered Oreos
Here are some additional tips to ensure your chocolate-covered Oreos turn out perfectly every time:
- Quality Matters: Use high-quality chocolate for the best taste and smooth finish. Cheap chocolate may not melt as well and can taste waxy.
- Don’t Overload with Toppings: While it’s fun to add extras like sprinkles and nuts, be careful not to overwhelm the Oreo itself. A little decoration goes a long way.
- Experiment with Flavors: Try different flavors of Oreos (mint, peanut butter, etc.) to create a fun twist on the classic recipe.
- Storage: Store your homemade chocolate-covered Oreos in an airtight container at room temperature for up to a week or refrigerate them for a longer shelf life.
Making homemade chocolate-covered Oreos is easy, fun, and sure to impress your friends and family. Whether for a special occasion or just a sweet treat, these cookies are perfect for any occasion. For all your baking needs, check out Heavenly Delights Bakery for the best ingredients and tools to make your creations even more delicious!

 Ole & Steen4.0 (513 reviews)
 Elmwood Pastry Shop4.0 (249 reviews)
 Barefoot Landing Breads5.0 (2 reviews)
 Honey'z Sweets & Deliveries LLC5.0 (140 reviews)
 Panaderia Y Pasteleria La Estrella5.0 (36 reviews)
 Mendobakery4.0 (7 reviews)
 How to Make Bakery-Style Cinnamon Sugar Biscuits
 The Secret to Making Flaky Puff Pastry: Expert Tips for Perfect Results
 How to Make Your Own Bakery-Style Brioche at Home
 How to Create the Perfect Donut Glaze
 How to Create a Beautiful, Layered Wedding Cake
 How to Make the Best Pumpkin Churros from Scratch at Home