
How to Make Your Own Bread Starter for Baking
- 1. What is a Bread Starter?
- 2. Why You Should Make Your Own Bread Starter
- 3. Ingredients for Making a Bread Starter
- 4. Step-by-Step Guide to Making Your Own Bread Starter
- 5. Tips for Baking with Your Homemade Bread Starter
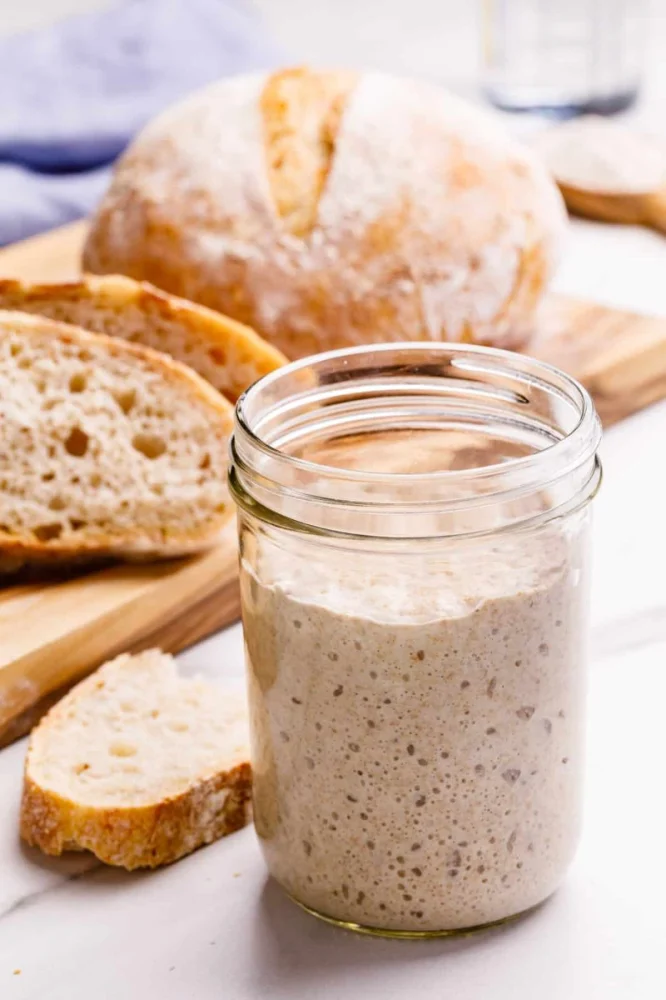
1. What is a Bread Starter?
A bread starter, often referred to as a sourdough starter, is a fermented mixture of flour and water that is used to cultivate wild yeast and bacteria. These microorganisms are essential for leavening bread, giving it a unique flavor and texture. The starter is used as the foundation for baking bread and can be kept alive indefinitely with regular feedings. Unlike commercial yeast, which is added in measured amounts, a bread starter relies on natural fermentation to raise the dough.

Julius Sturgis Pretzel Bakery / sturgis pretzels lititz
LititzLancaster CountyPennsylvania
219 E Main St, Lititz, PA 17543, USA
2. Why You Should Make Your Own Bread Starter
Making your own bread starter is an incredibly rewarding process. Not only does it allow you to bake bread without relying on store-bought yeast, but it also gives you the opportunity to create a personalized flavor profile for your bread. A homemade starter develops a more complex and tangy flavor, which is something that many bakers prefer in their sourdough and other bread recipes. Additionally, by making your own starter, you have full control over its health and can maintain it indefinitely, which is much more cost-effective in the long run.

Torres Family Bakery LLC / panaderia lancaster pa
LancasterLancaster CountyPennsylvania
447 S Prince St, Lancaster, PA 17603, USA
3. Ingredients for Making a Bread Starter
The ingredients for a basic bread starter are simple and easy to find. Here’s what you’ll need:
- Flour: You can use all-purpose flour, whole wheat flour, or a combination of both. Whole wheat flour tends to encourage more yeast activity, so it’s often a good choice when starting your starter.
- Water: Use filtered or dechlorinated water to ensure the health of the yeast. Tap water with chlorine can inhibit fermentation, so it’s important to avoid it.
- Time and Patience: While the ingredients are simple, the process of creating a bread starter requires patience. You’ll need about 5-7 days to fully cultivate the starter.
4. Step-by-Step Guide to Making Your Own Bread Starter
Now that you have your ingredients, it’s time to make your own bread starter! Follow these easy steps to get started:
- Day 1: Mix the Flour and Water – In a glass or plastic container, combine 1 cup of flour with 1/2 cup of water. Stir until you have a thick but slightly loose paste. Cover the container loosely with a lid or cloth, and let it sit at room temperature for 24 hours.
- Day 2: Add More Flour and Water – After 24 hours, you may not see much activity, and that’s okay. Add another 1/2 cup of flour and 1/4 cup of water to the mixture. Stir well and cover again. Let it sit for another 24 hours.
- Day 3-4: Continue Feeding – Over the next 2-3 days, you should begin to see small bubbles forming, indicating that fermentation has started. Continue adding 1/2 cup of flour and 1/4 cup of water each day, stirring thoroughly. You may also notice a sour smell developing, which is a sign of healthy fermentation.
- Day 5: Discard and Feed – By day 5, your starter should be more active with visible bubbles and a tangy aroma. At this point, discard half of the mixture (about 1/2 cup), and feed the remaining starter with another 1/2 cup of flour and 1/4 cup of water. Stir well and let it sit.
- Day 6-7: Ready for Baking – By day 6 or 7, your starter should be bubbly, slightly sour, and ready to use. If it hasn’t reached this point yet, continue feeding it for another day or two. Once it’s active and has doubled in size within 4-6 hours of feeding, it’s ready to use in your bread recipes.
5. Tips for Baking with Your Homemade Bread Starter
Now that your homemade bread starter is ready, here are some helpful tips for baking with it:
- Use Starter at Its Peak: When baking, always use your starter when it’s at its peak activity – bubbly, risen, and full of air. This is when it will work best for your bread dough.
- Maintain Your Starter: To keep your starter alive, feed it regularly with fresh flour and water. If you're not baking every day, you can store your starter in the fridge and feed it once a week.
- Adjust Flour Ratios: Different flour types (like whole wheat, rye, or white) will impact the flavor and texture of your bread. Experiment with different combinations to find your preferred taste and consistency.
- Start with Simple Recipes: Once your starter is ready, start with simple bread recipes, like sourdough or basic artisan bread, before venturing into more complex creations.
Making your own bread starter from scratch is a satisfying process that can enhance your baking skills and create delicious, artisanal bread. With patience and the right technique, you’ll be able to enjoy homemade bread that’s flavorful and made with love. For more baking tips and quality ingredients, visit Heavenly Delights Bakery for everything you need to bake like a pro.
 Small Oven Bakery4.0 (376 reviews)
 Alpine Bakery5.0 (11 reviews)
 Mouthful of Cakes Custom Cake/Treat Shop4.0 (67 reviews)
 Best Donuts4.0 (149 reviews)
 Tiffany's Donuts & Sandwiches4.0 (41 reviews)
 Walmart Bakery0.0 (0 reviews)
 How to Create the Perfect Chocolate Drizzle for Cakes Step by Step
 How to Create a Stunning Cake Display for Your Next Event
 The Best Bakery Pastries to Make Ahead for Busy Weekdays
 How to Make the Best Chocolate Cake with Cocoa Powder
 Discover the Magic of Bread Baking: A Beginner’s Journey
 How to Make Bakery-Style Chocolate Dipped Croissants