
- 1-Introduction to Baked Alaska
- 2-Key Ingredients for Homemade Baked Alaska
- 3-Step-by-Step Guide to Making Baked Alaska
- 4-Tips for Perfecting Your Baked Alaska
- 5-History and Fun Facts About Baked Alaska
1-Introduction to Baked Alaska
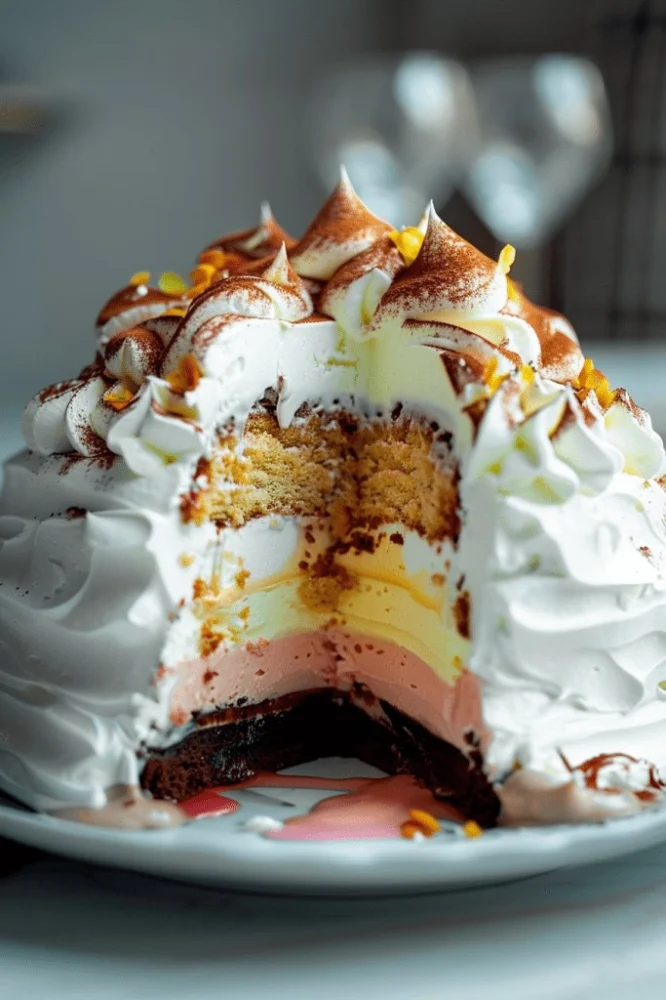
Baked Alaska is a show-stopping dessert that combines ice cream, cake, and meringue, all enveloped in a golden, crispy outer shell. It’s a perfect dessert for special occasions or simply when you want to impress guests with something unique. While the name sounds extravagant, making your own homemade Baked Alaska is easier than you think. In this guide, we'll walk you through everything you need to know about creating this classic dessert right in your own kitchen.

Cheese And Bread / paneantico bakery brooklyn
9524 4th Ave, Brooklyn, NY 11209, USA
2-Key Ingredients for Homemade Baked Alaska
Before you start baking your Baked Alaska, it’s essential to gather the right ingredients. Here’s what you’ll need:
- Ice Cream: Choose your favorite flavors for the ice cream layers. Traditional choices include vanilla, chocolate, or strawberry, but feel free to get creative with your selection.
- Cake Base: A sponge cake or angel food cake works best. It provides a light, airy base for the ice cream and meringue.
- Meringue: You’ll need egg whites, sugar, and a pinch of cream of tartar. This mixture forms the crispy outer shell of the Baked Alaska.
- Flavoring (Optional): Some recipes call for a splash of liqueur, like rum or Grand Marnier, to enhance the flavor of the dessert. This step is optional but adds an elegant touch.
- Tools: A baking sheet, large spoon, and a kitchen torch or oven for browning the meringue.
3-Step-by-Step Guide to Making Baked Alaska
Now that you’ve gathered your ingredients, let’s dive into the process of making your own homemade Baked Alaska. Follow these simple steps:
Bagels Royale / royal bagel montclair
364 Knickerbocker Rd, Dumont, NJ 07628, USA
Step 1: Prepare the Cake Base
Start by baking your cake base. Use a store-bought sponge cake or bake your own from scratch. Once baked, allow the cake to cool. Cut the cake into a circle or square that is slightly larger than your ice cream layer.
Step 2: Layer the Ice Cream
Soften the ice cream slightly by leaving it at room temperature for a few minutes. Then, spread the softened ice cream over the cake base. You can use one flavor or create layers of different flavors for a colorful and delicious effect. Freeze the cake and ice cream combination for about 30 minutes to harden the ice cream.
Step 3: Make the Meringue
While the cake and ice cream are chilling, begin making the meringue. Beat the egg whites with a pinch of cream of tartar until soft peaks form. Gradually add sugar and continue beating until stiff peaks form. The meringue should be smooth, glossy, and thick.
Step 4: Assemble the Baked Alaska
Once your meringue is ready, remove the cake and ice cream from the freezer. Spread the meringue over the ice cream and cake, making sure to cover the entire surface. You can use a spatula to create decorative swirls or peaks in the meringue.
Step 5: Bake or Torch the Meringue
Preheat your oven to 450°F (230°C). Place the assembled Baked Alaska in the oven for about 3-5 minutes or until the meringue turns golden brown. Alternatively, you can use a kitchen torch to brown the meringue if you prefer a more controlled approach. Once done, remove the dessert from the oven and allow it to cool slightly before serving.
4-Tips for Perfecting Your Baked Alaska
While Baked Alaska is relatively simple to make, there are a few tricks to ensure it turns out perfectly every time:
- Use the right ice cream: Make sure your ice cream is firm enough to hold its shape when you layer it over the cake. Homemade ice cream might not work as well as store-bought varieties that are made with stabilizers.
- Chill the dessert thoroughly: After assembling the Baked Alaska, ensure it is well-frozen before applying the meringue and baking. This will prevent the ice cream from melting too quickly when exposed to heat.
- Make it ahead of time: You can prepare Baked Alaska up to 24 hours in advance. This allows the dessert to set properly and gives you more time to enjoy your guests.
5-History and Fun Facts About Baked Alaska
Baked Alaska is a dessert with an interesting history. It was created in 1867 by a French chef named Charles Ranhofer at the Delmonico’s restaurant in New York. The dessert was inspired by the purchase of Alaska from Russia, and it became a popular way to showcase ice cream in a hot and crispy form. Over the years, Baked Alaska has been a favorite for celebrations, adding a dramatic flair to dessert tables. Did you know that the dessert was also served to guests at the White House during the Eisenhower administration?
Whether you're making it for a birthday, a dinner party, or just to enjoy as a special treat, Baked Alaska is sure to impress everyone at the table with its balance of textures and rich flavors.
If you’re looking for the best baking ingredients or need assistance with more delicious dessert recipes, check out 【Heavenly Delights Bakery】 for all the essentials and more. We have everything you need to bake the perfect Baked Alaska and other tasty treats!
 Bubbys Breads-Maplewood Market5.0 (13 reviews)
 Bristol Bagel Works4.0 (285 reviews)
 Utopia Bagels4.0 (161 reviews)
 Too Sweet Cakes3.0 (15 reviews)
 Mom's Love, Cookies, and Fudge5.0 (1 reviews)
 Sasquatch Cookies4.0 (671 reviews)
 How to Make Perfectly Flaky Pie Crusts Every Time
 The Secret to Making Perfectly Soft Sugar Cookies: Tips and Tricks
 How to Start Your Own Home Bakery Business: A Step-by-Step Guide
 How to Make the Best Vegan Chocolate Cake from Scratch
 How to Make the Best Homemade Chocolate Covered Oreos: A Step-by-Step Guide
 How to Bake the Best Homemade Apple Crisp with Real Flavor